How to Build a Tool Chest
To build a tool chest, cut 3/4-inch plywood panels to your tool footprint, glue and screw a square carcass, fit drawer slides rated for the drawer weight, and finish with dividers and a non-slip liner. Size the box to your longest tool first, then build drawers to fit.
On this page (9 sections)
- How do you plan a tool chest before cutting wood?
- What materials and tools do you need to build a tool chest?
- How do you cut and assemble the chest carcass?
- How do you size and fit drawers that slide smoothly?
- How do you keep tools from sliding in a finished chest?
- How do you square the box and keep the drawers aligned?
- What finishing touches make a DIY chest last?
- How much does a DIY tool chest cost to build?
- What is the simplest order for building a tool chest?
To build a tool chest, cut 3/4-inch plywood panels to your tool footprint, glue and screw a square carcass, fit drawer slides rated for the drawer weight, and finish with dividers and a non-slip liner. Size the box to your longest tool first, then build drawers to fit.
Building your own chest pays off when store sizes don't match your tools. You choose the drawer heights, the depth and where each category sits, so the finished chest works like a custom cabinet.
How do you plan a tool chest before cutting wood?
Start by listing your biggest and heaviest tools, because they set the cabinet size. Measure the longest wrench, the tallest screwdriver and the widest socket case, then add clearance.
Work out drawer counts from tool groups rather than guessing. Deep drawers at the bottom suit power tools and hammers, while shallow drawers near the top suit sockets, bits and pliers.
Decide whether the chest sits on a bench, a cabinet base or casters. A rolling chest needs a sturdier bottom panel and locking wheels so it stays put when a drawer is pulled out.
Sketch the carcass with outside dimensions, then note the plywood thickness on every joint. A simple plan with two sides, a top, a bottom and a back keeps the first build manageable.
Allow a small gap around each drawer so it slides without binding. Three-sixteenths of an inch per side is a common starting point, checked against your slide instructions.
What materials and tools do you need to build a tool chest?
Use 3/4-inch plywood for the carcass and drawer boxes, 1/4-inch plywood for the back, and hardwood strips for drawer runners if you skip metal slides. Birch or sanded pine plywood gives clean faces and takes paint well.
Gather a circular saw or table saw, a drill and driver, a square, clamps, wood glue and 1-1/4-inch screws. A router or a rabbeting bit helps cut drawer bottoms into grooves, though a simpler build can pin bottoms in place.
Drawer slides come in two common types. Ball-bearing side-mount slides screw to the drawer side and the cabinet wall, while undermount slides hide below the drawer and need a flat, square bottom.
Buy a slide length close to your drawer depth. A 16-inch slide suits a drawer around 16 to 18 inches deep, and mismatched lengths waste travel or stop the drawer short.
Add a few sheets of sandpaper, a finish such as polyurethane, and a set of clamps long enough to span the carcass. Clamps matter more than any single power tool on this job.
How do you cut and assemble the chest carcass?
Cut the two sides, top, bottom and back first, then dry-fit them on a flat surface before any glue goes on. A flat floor or bench keeps the box square from the start.
Mark the drawer openings on the sides at the same height on both panels. Clamp the two sides together and cut or rout them as a pair so the openings line up.
Glue and screw the bottom between the sides, then add the top and a fixed shelf where the drawer stack changes. Predrill near panel edges so the plywood doesn't split.
Check both diagonals with a tape measure after the glue sets. Equal corner-to-corner measurements mean the box is square, which matters more than a perfect finish for drawer fit.
Fit the 1/4-inch back panel last to hold the box square. Square the carcass with a clamp across the diagonals before fastening it, then leave the chest to dry overnight.
Should you build drawers or buy a rolling cart?
Build drawers if you want custom heights for long wrenches or deep socket cases. Buy a cart when you need storage now and don't want to cut joinery.
The VEVOR 4-Tier Rolling Tool Cart gives you 3 large trays and a lockable drawer in a 32.7 x 13.8 x 32.5 inch carbon steel frame. It holds up to 350 lb, with 100 lb per tray and 33 lb in the drawer, and rolls on 2 swivel and 2 fixed casters.
Its side pegboards with hooks keep often-used tools within reach, which a plain wooden chest doesn't offer without added hardware. Two casters have brakes to hold it in place.
Skip it if you want every drawer built to your own sizes or need a bench-height cabinet. For a chest you carry between jobs, compare portable tool chests with drawers.
How do you size and fit drawers that slide smoothly?
Build each drawer box about 1 inch narrower than its opening and match the slide length to the drawer depth. Measure the opening, subtract the slide pair's combined thickness and the clearance your slides ask for.
Cut drawer sides, front and back from 3/4-inch plywood, with a thinner bottom set in a groove or fastened underneath. A drawer holding sockets and wrenches needs a bottom that won't bow under load.
Fit the slides with the drawer sitting in its opening, using a spacer block to keep gaps even. Screw the cabinet half first, test the travel, then fix the drawer half.
A drawer that rubs at the back usually means the carcass is out of square or the slides sit at different heights. Loosen the screws a turn and shim as needed rather than sanding the drawer sides.
Label each drawer with its tool group while it's empty. That small step stops the chest from filling with mixed tools and makes the first layout easier to keep.
How do you keep tools from sliding in a finished chest?
Line every drawer with non-slip material and divide it by tool type, so sockets, wrenches and screwdrivers each have a home. Lining also cushions tools against the drawer bottom.
Cut the liner slightly oversize, test-fit it, then trim to the drawer walls. A textured liner grips better than a smooth mat, and a washable surface wipes clean after oily tools sit on it.
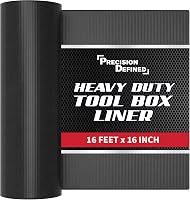
The Precision Defined liner comes as a 16 ft x 16 inch roll with straight grid lines for square cuts. Precision Defined says the memory-foam-like material clings to tools over time and the liner is washable.
It's a fit for anyone finishing a chest with several drawers, since one roll covers plenty of drawer bottoms. Cut a fresh piece for each drawer rather than reusing trimmed scraps.
Skip it if your drawers already have a factory liner or you prefer bare wood. Our guide to the best way to organize sockets in a tool chest covers liner and tray layouts in more detail.
How do you lay out sockets and wrenches?
Group sockets by drive size and wrenches by length, using trays or rails so each size is visible at a glance. Loose sockets waste the most time in a deep drawer.
The SWANLAKE organizer set has 18 pieces with 238 clips across 1/4-inch, 3/8-inch and 1/2-inch drive sizes. Its spring-loaded clips hold sockets on rails, and the colors separate SAE from metric.
The rails are 13.8 inches long, so measure drawer width before committing to a layout. Removable end caps let you add or remove clips as your set grows.
Skip the set if you keep sockets in a molded case that already holds them. For the wrench side of the drawer, see how to organize wrenches in a tool chest drawer.
How do you square the box and keep the drawers aligned?
Assemble on a flat surface and check diagonals as you go, because a square carcass is what keeps drawers from rubbing. Small errors in the box show up as sticking drawers later.
Clamp a straightedge across the top before fastening it and measure both diagonals. Adjust the clamps until they match, then drive the screws while the box is held.
Mount slides level with each other on both sides of each opening. A short scrap of wood as a spacer keeps the height consistent across the stack.
Once the chest is built, open and close every drawer several times before loading it. Fix any tight spot now, when the screws are still easy to reach.
If you later buy a steel chest and a drawer jams, our guide to how to fix a Craftsman tool chest drawer covers slide and alignment fixes.
What finishing touches make a DIY chest last?
Seal the wood, fit a top that takes wear, and add handles or casters so the chest holds up in a garage. Paint or polyurethane on the plywood edges slows moisture damage.
Round over sharp drawer-front edges with sandpaper. A light sanding on the drawer sides helps them slide without catching on the finish.
Add a durable top surface such as a hardwood strip or a sheet of laminate. A worktop that takes tools and parts without denting makes the chest more useful than storage alone.
Fit casters on a larger chest so you can move it, and choose locking wheels for the front pair. A chest that stays put when a drawer is open is safer to load.
Let the finish cure fully before lining drawers. A liner pressed onto wet polyurethane can stick or mark the wood.
How much does a DIY tool chest cost to build?
Plan on plywood and drawer slides as the main costs, with liner, finish and hardware adding the rest. A small chest with 3 or 4 drawers is a modest project; a full cabinet with a dozen drawers costs more in slides than in wood.
Slides are the budget item that decides quality. Cheap slides save money up front but wear faster in a drawer you open daily.
Use the offcuts for dividers and small parts bins rather than buying extra material. A few scraps turned into socket dividers save a purchase later.
If your tools keep growing, a rolling cart plus a wooden chest gives you a two-part system without rebuilding. Compare stackable tool systems when you plan for more storage.
What is the simplest order for building a tool chest?
Build in this order: measure your tools, cut the carcass, fit the slides, build the drawers, line and organize. Check square at each stage and the drawers will run straight.
Start with the largest tools, since they set the cabinet. Then size the drawer stack, cut and dry-fit the box, and glue and screw it square.
Build drawer boxes to fit the openings, then mount slides at matching heights. Finish the wood, add the top and casters, and line each drawer before tools go in.
Organize by tool type: sockets on clips, wrenches by length, and small parts in dividers. That layout keeps the chest useful long after the build.
If your first attempt is a small chest, use what you learn on a bigger cabinet later. For storage that rolls between jobs, browse portable tool chests with drawers before you build a second one.
Frequently asked questions
What wood is best for a homemade tool chest?
Use 3/4-inch plywood for the carcass and drawer boxes because it stays flat and holds screws well. Hardwood like poplar or maple suits face frames and drawer fronts that take knocks.
Avoid particle board for a chest that will carry heavy tools.
How thick should plywood be for a tool chest?
Half-inch plywood works for light drawers and dividers, but 3/4-inch is the safer choice for the carcass, shelves and drawer bottoms that carry wrenches and sockets. Heavier drawers need a thicker bottom or a center support to stop sagging.
How much weight should drawer slides hold?
Add up the tools that go in each drawer and pick slides rated above that total. A drawer holding a socket set and wrenches can run past 50 lb, so 100-lb slides suit most chests.
Cheaper 50-lb slides are fine for shallow top drawers.
Do you need a back panel on a DIY tool chest?
A back panel squares the carcass and keeps dust out, so fit one even though it is not structural. Cut it from 1/4-inch plywood and nail or screw it after checking the box for square.
A removable panel also gives access to drawer slides later.